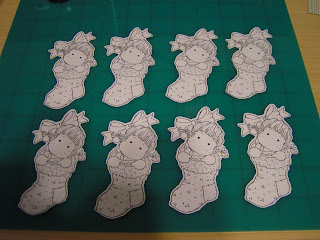
Have you ever had a great design for a Christmas card but you were intimidated about cutting out a gazillion images to put on it? I have to make about fifty cards every year and I've avoided card designs that called for me to cut out my stamped image. So....if you have a scanner, a stamp placement tool and your Make the Cut software works with a cutter (I have a Cricut), here's your answer:
1. Stamp your image on white card stock and scan it. Save the scanned image on your computer.
2. Open your Make the Cut software.
3. Import and Pixel Trace your image.
4. Tweak your image until the outline of your stamp is completely filled in. You aren't worried about the inside, just the outline. When you are happy with it, click on Import at the bottom of the window.
5. DO NOT INCREASE OR DECREASE THE SIZE OF YOUR IMAGE AT ANY POINT.
6. Break apart your image. You will want to keep the outline and remove everything inside. Sometimes it is easier to delete a portion of the inside to make sure you are grabbing just the outline and move it to one side.
7. Delete all the pieces on the left and move the solid image to the left.
7. This is what your screen should look like now. Don't be concerned with the white spaces in the image.
8. Select your image and click on the shadow icon. I left the shadow width at the default, but you can change that setting if you wish and make your shadow wider. Click on accept.
9. Move your original image to the right. Break apart the image on the left (the shadow) if there are any bits left in it. Again, do not increase or decrease the size of your image. You can now delete the image on your right, you won't need it again. If there were bits on the shadow image, you can move the entire image to the right and delete what is left.
10. After deleting any pieces you are left with just the shadow. On this particular image - Tucked in Tilda - I can arrange ten shadows on an 8.5 x 11" sheet of Neenah Smooth paper.
11. I copied my original shadow and pasted in place. Create as many shadows as you like being careful not to change the size.
12. After cutting and removing the excess paper, this is what you are left with.
13. Place a small piece of repositionable tape on your work surface and adhere your first shadow to it (this keeps the image from moving while you stamp it).
14. Stamp your image on the acrylic plate of your stamp positioning tool. I use a Stamp-a-ma-jig but there are many on the market. Position your acrylic plate over your shadow until an equal amount of blank space is all around your image. At this point ink up your stamp. It's easiest for me to have the inked stamp in my right hand (I am right-handed), clamp the positioner with my left hand and use a finger on my right hand to move the acrylic plate to the right and stamp my image.

I used the 'extreme' speed setting on my Make the Cut, but I cut them twice to ensure a clean cut. As you make these files, name them with the stamp name and save them for the future. After you've done this a couple of times, it will only take you minutes to create the Make the Cut file. I will still have to color these, but I won't have to cut them out individually and believe me, that not only saves time, but your hands. If you have any questions, please leave me a comment with your e-mail address and I'll answer if I can.
Edited 11/4/11: I discovered by manipulating the same stamped image, I could extract just the stocking and cut multiples of it out in designer paper.


